> ## Documentation Index
> Fetch the complete documentation index at: https://docs.navattic.com/llms.txt
> Use this file to discover all available pages before exploring further.
# Salesforce
> Automations to operationalize your sales process.
## Overview
The Navattic Salesforce integration uses a direct connection through Salesforce's standard OAuth flow, connecting directly to your Salesforce instance using standard objects and custom fields.
## Salesforce Configuration
### Custom Object: Navattic Session
When connecting Salesforce to Navattic, you have the option to create a custom object called **Navattic Session** to track individual demo viewing sessions. This object includes:
* Session ID (text, primary field)
* Started At (datetime)
* Full Name (text, 255 characters)
* Email (text, 255 characters)
* Duration (minutes) (number with 3 decimal places)
* Steps Viewed (whole number)
* Demos (text, 255 characters)
* Flows (text, 255 characters)
* Very Interested Areas (text, 255 characters)
* Somewhat Interested Areas (text, 255 characters)
* Not Interested Areas (text, 255 characters)
* Opportunity (lookup to Opportunity)
* Account (lookup to Account)
* Contact (lookup to Contact)
* Lead (lookup to Lead)
### Integration User Requirements
The Salesforce user account that connects to Navattic needs specific permissions to sync demo engagement data.
The connected user must have **Read** and **Edit** access to:
* Lead object
* Contact object
* Account object
* Opportunity object
* Navattic Session object (custom)
The user needs **Read** and **Edit** access to:
**Standard Fields:**
* Email (on Lead and Contact)
* FirstName (on Lead and Contact)
* LastName (on Lead and Contact)
* Name (on Account and Opportunity)
* Website (on Account)
* Company (on Lead)
**Custom Fields:**
* All Navattic custom fields listed above
* **API Enabled** - This permission must be enabled on the user's profile or permission set
* **View All Data** (recommended) - Makes setup easier, though not strictly required
* **Modify All Data** (recommended) - Makes setup easier, though not strictly required
During the initial connection, Navattic automatically creates a Permission Set that grants access to:
* The Navattic Session custom object
* All fields on the Navattic Session object
* Full CRUD permissions on Lead, Contact, Account, and Opportunity objects
This permission set is automatically assigned to the connected integration user.
**Option 1: Dedicated Integration User (Recommended)**
Create a dedicated Salesforce user specifically for the Navattic integration:
* Clear audit trail of all Navattic activities
* Easy to troubleshoot permission issues
* Can be disabled without affecting other integrations
* Doesn't consume a regular user license (use Integration User license if available)
Setup steps:
1. Create a new user with Integration User or regular license
2. Assign a profile with API Enabled permission
3. Grant the required object and field permissions
4. Use this user to connect Navattic
**Option 2: System Administrator User**
Use your Salesforce admin account to connect:
* Quick setup with no permission configuration needed
* Guaranteed to have all required permissions
Disadvantages:
* Less clear audit trail
* All Navattic actions appear as admin actions
* If admin leaves organization, integration may break
## Setup Steps
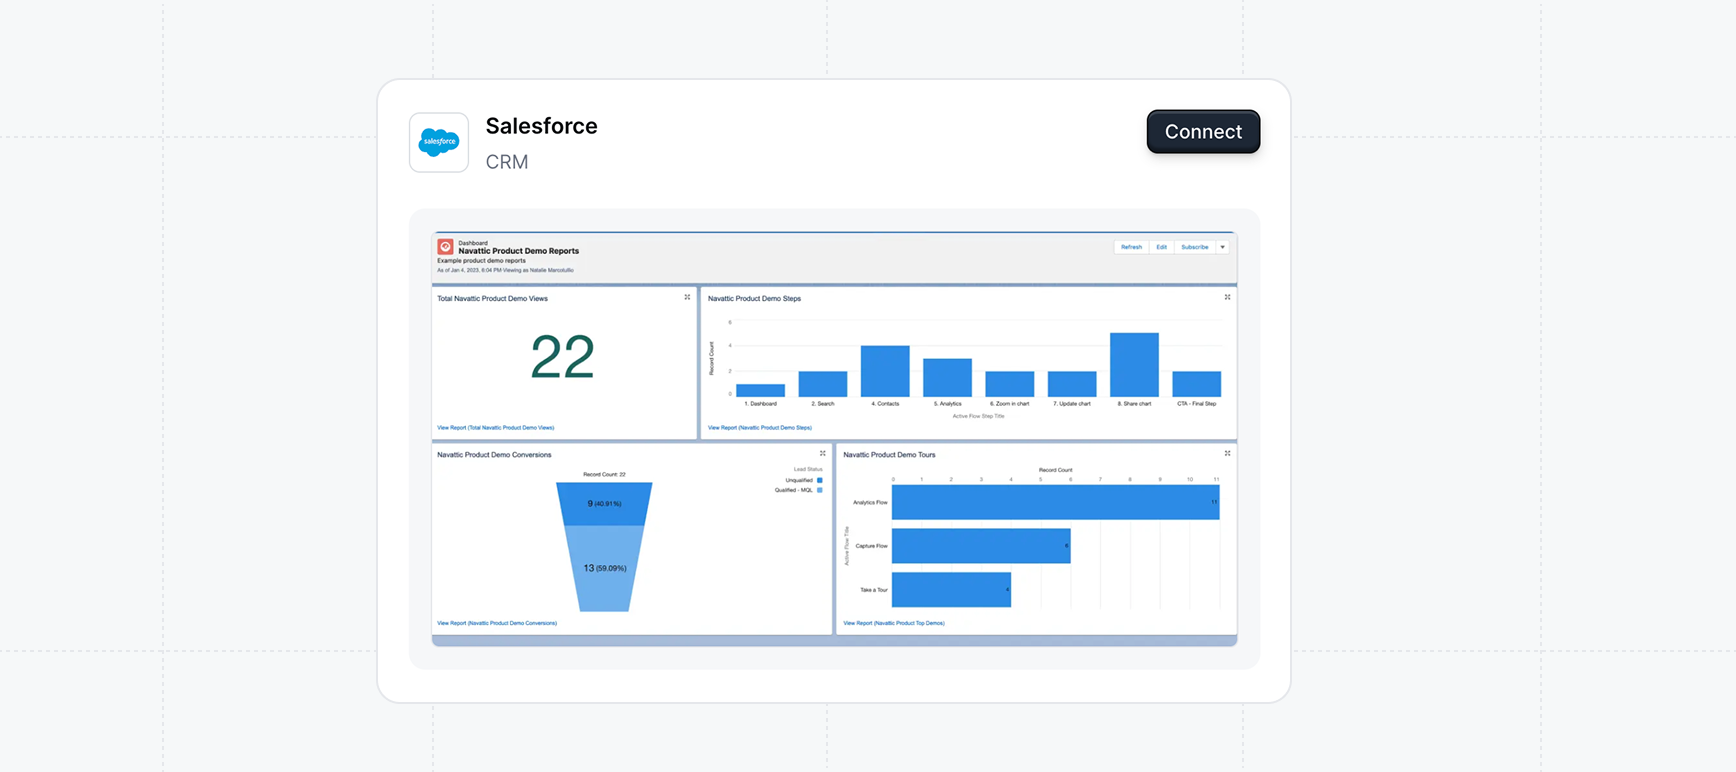
In Navattic, navigate to Settings > Integrations > Salesforce and click **Connect**.
 You'll be redirected to Salesforce to authorize the connection. Choose:
* **Production** for your live Salesforce instance
* **Sandbox** for testing in a Salesforce sandbox environment
Log in with the user account that will serve as the integration user.
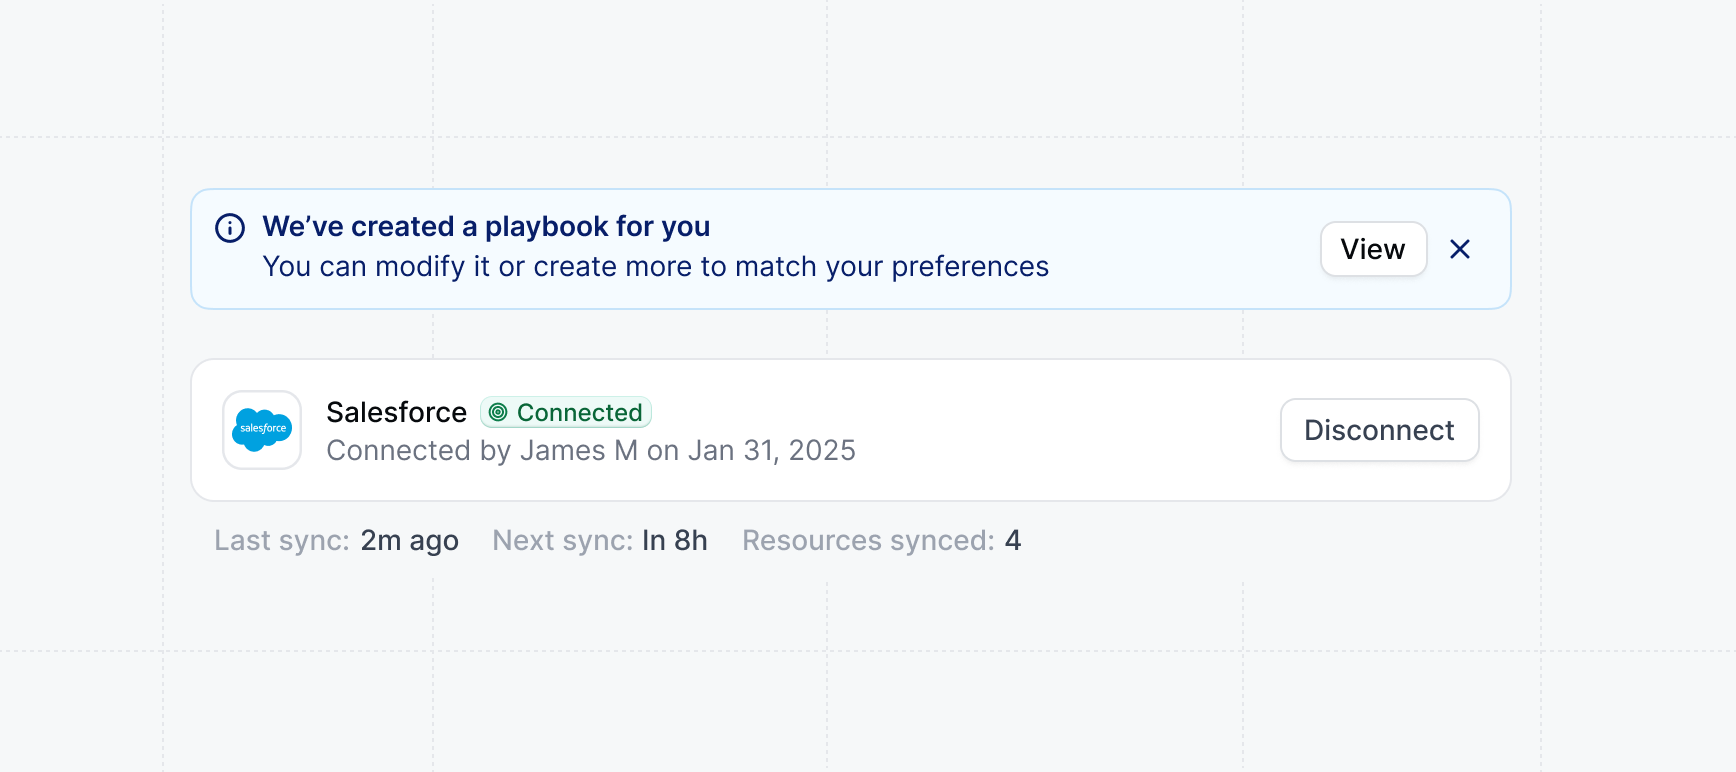
Once you've connected your Salesforce account, a `Playbook` will be automatically created to send engagement data from demos to your Salesforce Opportunity, Leads, Contact, and Accounts.
You can click view to manage the `Playbook` or refine the `Audience` filters.
You'll be redirected to Salesforce to authorize the connection. Choose:
* **Production** for your live Salesforce instance
* **Sandbox** for testing in a Salesforce sandbox environment
Log in with the user account that will serve as the integration user.
Once you've connected your Salesforce account, a `Playbook` will be automatically created to send engagement data from demos to your Salesforce Opportunity, Leads, Contact, and Accounts.
You can click view to manage the `Playbook` or refine the `Audience` filters.
 After connecting, Navattic automatically creates the custom fields on your Salesforce objects. You can verify these were created by:
1. In Salesforce Setup, go to Object Manager
2. Select Lead, Contact, Account, or Opportunity
3. Click Fields & Relationships
4. Look for fields starting with "Navattic\_"
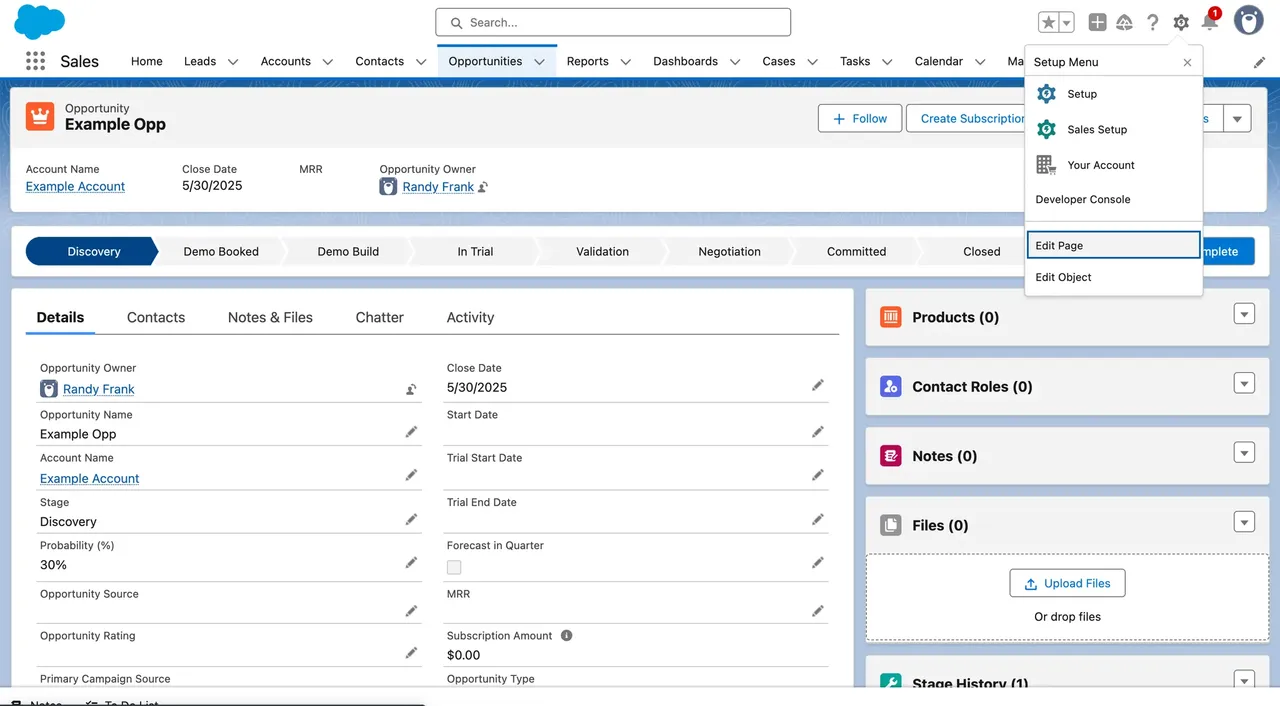
Navigate to your Salesforce object page that you'd like to edit (Opportunity, Lead, Contact, or Account). Select `Edit Page` under the `Setup Menu`.
After connecting, Navattic automatically creates the custom fields on your Salesforce objects. You can verify these were created by:
1. In Salesforce Setup, go to Object Manager
2. Select Lead, Contact, Account, or Opportunity
3. Click Fields & Relationships
4. Look for fields starting with "Navattic\_"
Navigate to your Salesforce object page that you'd like to edit (Opportunity, Lead, Contact, or Account). Select `Edit Page` under the `Setup Menu`.
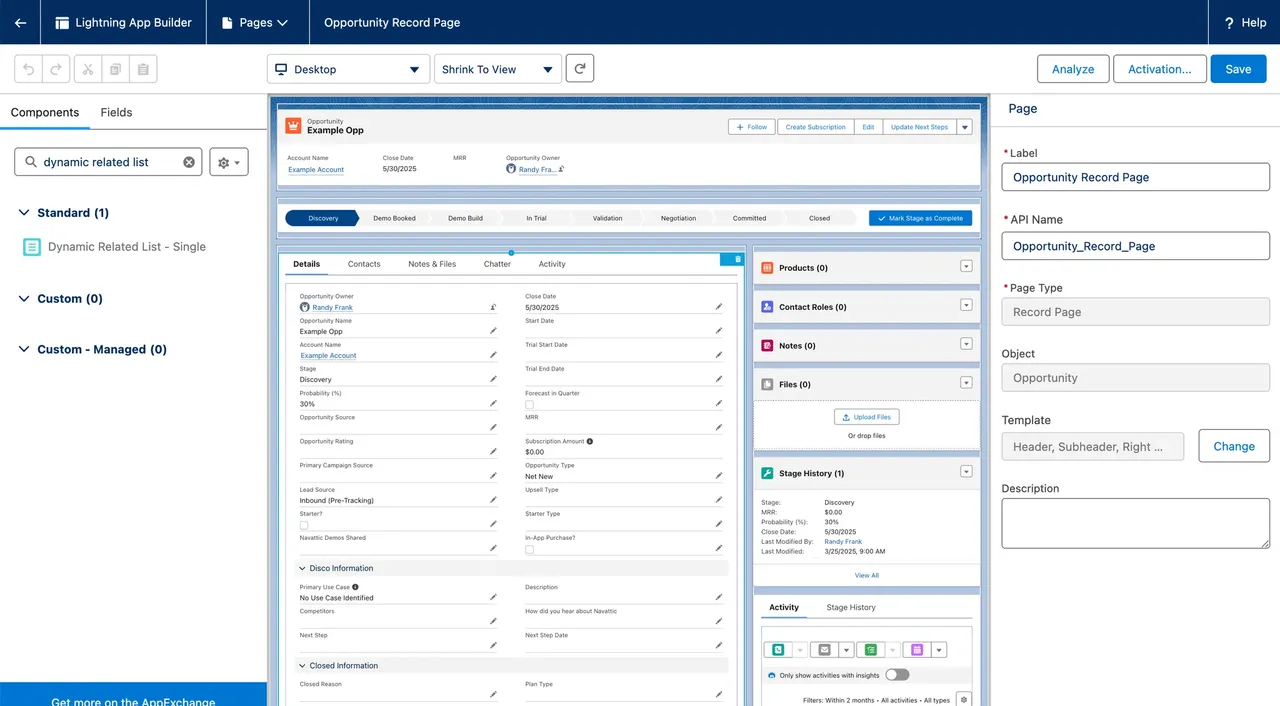
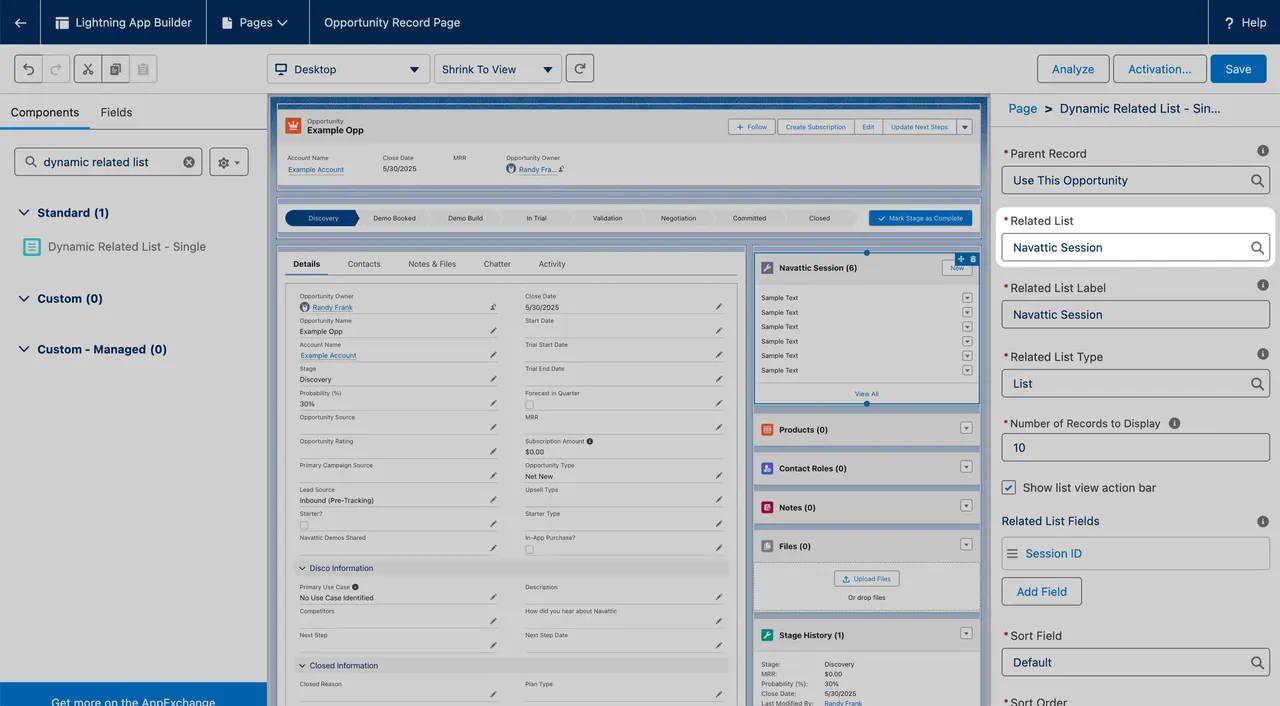
 Search for `Dynamic Related List - Single` in the `Components` search field.
 Search for `Navattic Session` in the Related List field. Make sure that the Parent Record is set to the default `Use This Opportunity` (or the relevant Salesforce object).
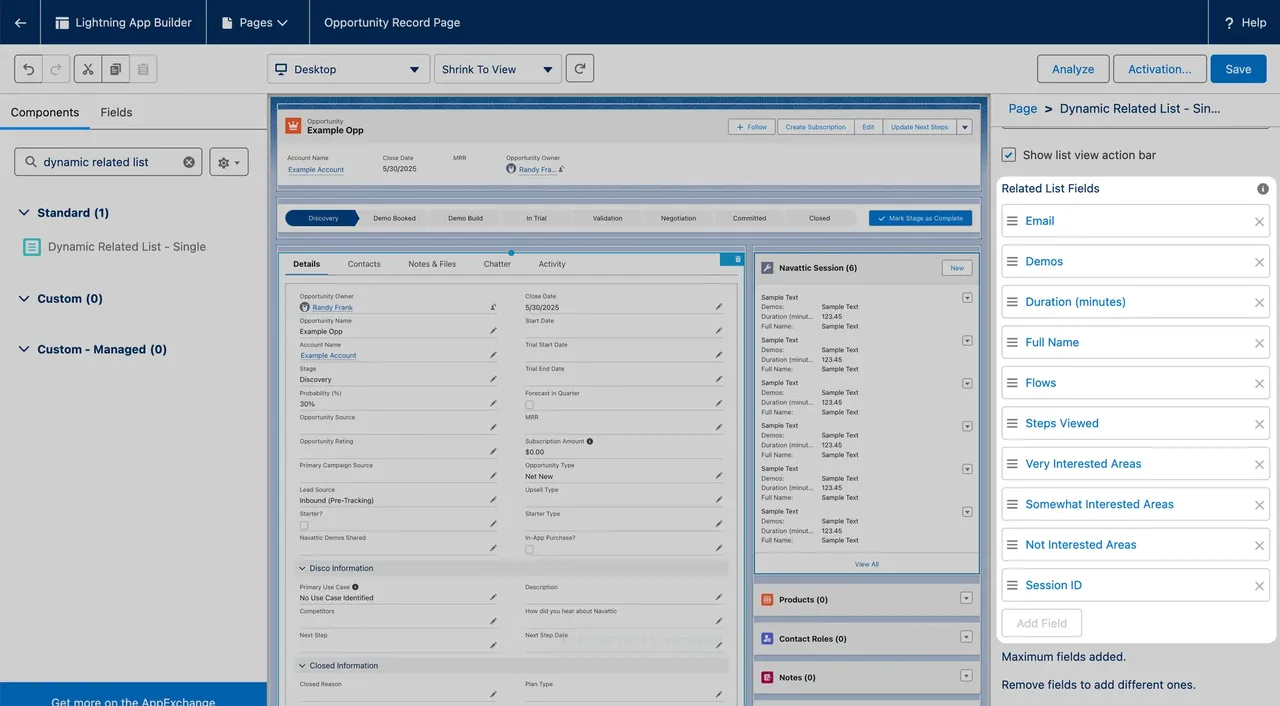
 Update the `Related List Fields` to show the following fields:
* Email
* Demos
* Duration (minutes)
* Full Name
* Flows
* Steps Viewed
* Very Interested Areas
* Somewhat Interested Areas
* Not Interested Areas
* Session ID
Update the `Related List Fields` to show the following fields:
* Email
* Demos
* Duration (minutes)
* Full Name
* Flows
* Steps Viewed
* Very Interested Areas
* Somewhat Interested Areas
* Not Interested Areas
* Session ID
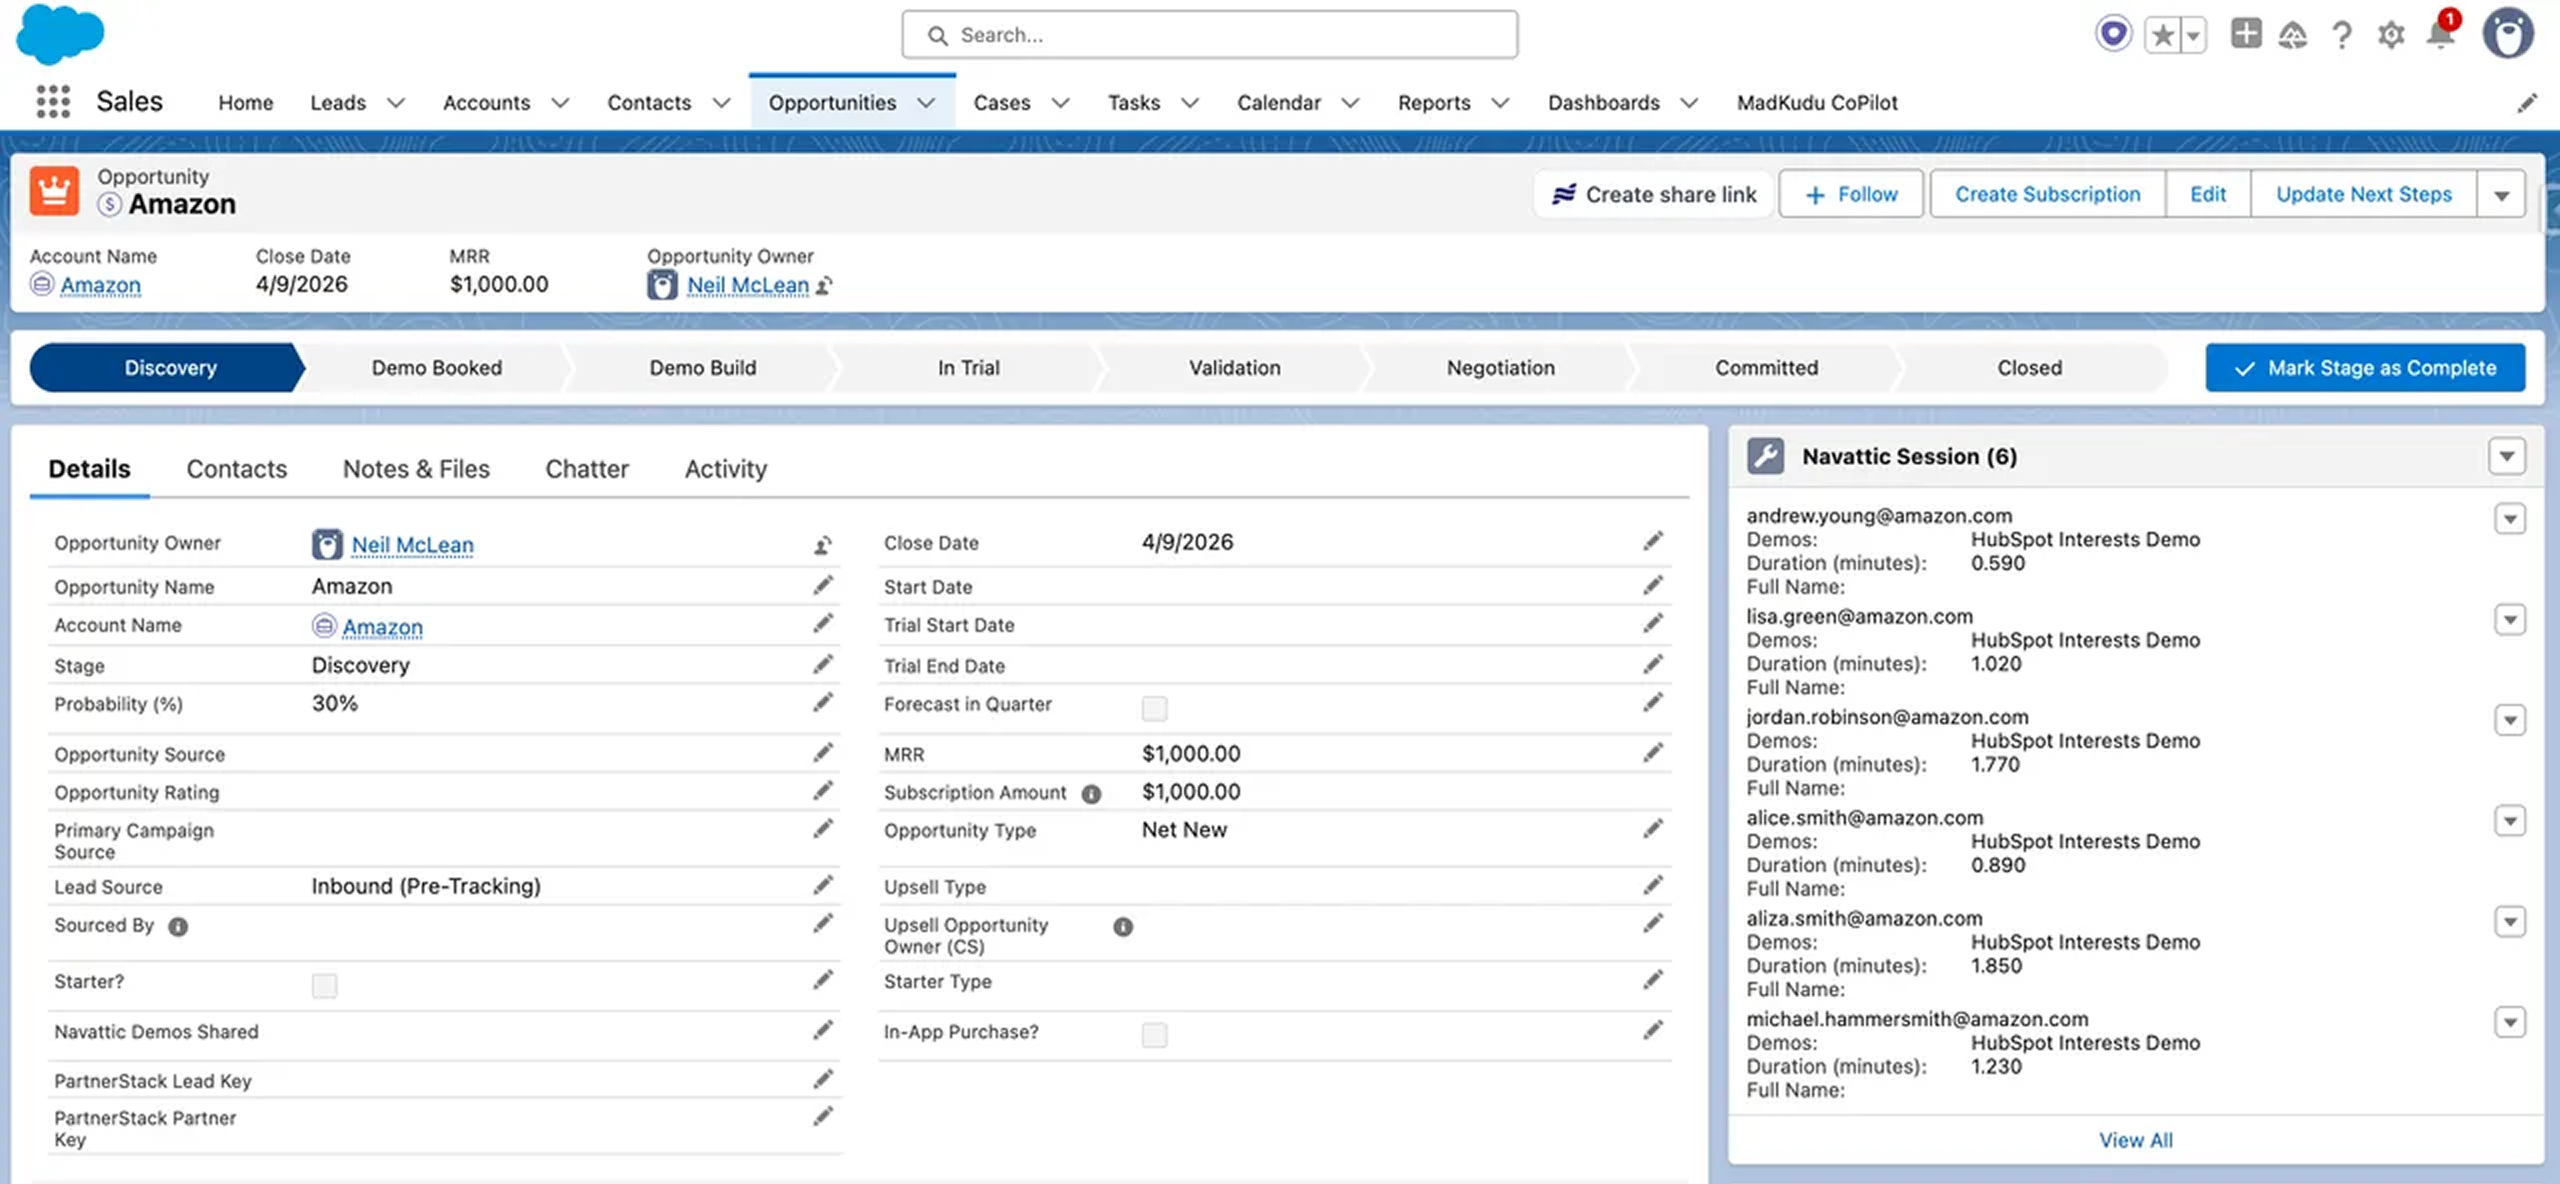
 Save the Page Builder and exit to the page layout.
Once a visitor views the interactive demo share link and completes their session, this will be logged in Salesforce.
Save the Page Builder and exit to the page layout.
Once a visitor views the interactive demo share link and completes their session, this will be logged in Salesforce.
 **Congratulations** -- You've finished setting up Salesforce with Navattic. Reps can now connect Salesforce opportunities to share links.
Go to the Salesforce integration settings in Navattic and set up field mappings to control which engagement data syncs to which Salesforce fields.
See [Field Mappings](/integrations/field-mappings) for detailed configuration options.
Create Playbooks to define when and how demo engagement data should sync to Salesforce.
See [Salesforce Integration](/integrations/salesforce) for complete setup instructions.
## Opportunity owner data
When a presentation is connected to a Salesforce opportunity, Navattic automatically looks up the opportunity owner in Salesforce and stores their details as custom properties on the session.
| Property | Description |
| ------------------------- | ----------------------------------------------------------------- |
| **OpportunityOwnerEmail** | The email address of the Salesforce user who owns the opportunity |
| **OpportunityOwnerId** | The Salesforce user ID of the opportunity owner |
These values are populated automatically — no additional configuration is required. They are included in webhook payloads and can be used in downstream workflows, such as routing notifications to the rep who owns the deal.
Opportunity owner data is only populated when a presentation share link has a Salesforce opportunity connected. See [Present demos](/launchpad/share/present#salesforce-opportunity) for instructions on connecting an opportunity to a share link.
## Field guide: viewing Navattic sessions in Salesforce
Once your admin has completed the setup above, every demo session that originates from one of your share links is automatically logged as a **Navattic Session** record in Salesforce — no manual data entry required.
### Connect your share links to opportunities
Sessions only appear on an opportunity when your share link is connected to one at the time you create it. Without that connection, session data is still captured but won't surface on the opportunity record.
To connect a share link to an opportunity:
* When sharing a demo through Launchpad, see [Sharing demos](/launchpad/share/demos#add-salesforce-opportunity) for step-by-step instructions.
* When creating a presentation for a live call, see [Present demos](/launchpad/share/present#salesforce-opportunity).
Opening Launchpad directly from a Salesforce Opportunity page automatically pre-fills the Opportunity field — no searching required. This auto-fill stays active for every additional share link you create from that same page.
### Find session data on the opportunity
Once a prospect views your demo, open the Opportunity record in Salesforce and scroll to the **Navattic Sessions** related list. Each row represents one individual viewing session — so if three people at the same account watch the demo, you'll see three separate rows.
### How to read each field
| Field | What it tells you |
| ----------------------------- | ------------------------------------------------------------------------------------------------------------------------------------------------------ |
| **Full Name** | The name of the person who viewed the demo. Includes stakeholders who filled in the recipient form, even if they weren't on your original invite list. |
| **Email** | The email address of the viewer. Use this to identify new contacts and update your outreach. |
| **Started At** | The date and time the session began. Use this to gauge recency and time your follow-up. |
| **Duration (minutes)** | How long the viewer spent in the demo. Longer sessions typically signal stronger engagement. |
| **Steps Viewed** | The number of demo steps the viewer completed. Helps you understand how far they got and where drop-off may have occurred. |
| **Demos** | Which demo or demos the viewer explored during the session. |
| **Flows** | Which flows within the demo the viewer clicked into. |
| **Very Interested Areas** | Topics the viewer flagged as high interest. Lead with these in your next conversation. |
| **Somewhat Interested Areas** | Topics the viewer showed moderate interest in. Worth addressing, but not the headline. |
| **Not Interested Areas** | Topics the viewer skipped or flagged as low priority. Avoid spending call time on these. |
| **Opportunity** | The Salesforce Opportunity this session is linked to. |
| **Account** | The Account associated with the linked Opportunity. |
| **Contact** | The Contact record matched to the viewer's email, if one exists. |
| **Lead** | The Lead record matched to the viewer's email, if one exists and no Contact match was found. |
| **Session ID** | A unique identifier for this session. Share this with support if you ever need to troubleshoot a specific viewing event. |
### Plays to run
Before any follow-up call, open the Navattic Sessions related list on the opportunity and note the **Very Interested Areas** for each viewer. Structure your agenda around those topics first — your prospect has already told you what they care about.
Check **Not Interested Areas** so you know what to skip. Spending time on areas a prospect explicitly deprioritized can stall momentum.
If you see a **Full Name** or **Email** you don't recognize, the demo was likely forwarded internally. That's a buying signal — someone on your contact's team is doing their own research.
Add that person as a contact on the opportunity and reach out directly. Multithreading early reduces the risk of a single point of failure in the deal.
Use the **Started At** field to follow up while the demo is still fresh. A same-day or next-day message referencing what the prospect explored tends to get a much higher response rate than a generic check-in.
See [When to share demos](/launchpad/share/when-to-share) for more guidance on timing your outreach.
If an opportunity has gone quiet and you see no new sessions in the past two weeks, it's a good time to re-engage. Create a fresh share link focused specifically on the prospect's **Very Interested Areas** from their last session, and send it with a short, personalized note.
A targeted demo link gives the prospect a low-friction reason to re-engage without requiring them to join a call.
If the Navattic Sessions related list isn't visible on your opportunity records, ask your Salesforce admin to add it by following the [setup steps](#setup-steps) on this page.
## Troubleshooting
### Connection Fails with "Insufficient Permissions"
**Cause:** The Salesforce user doesn't have API Enabled permission.
**Solution:**
1. Go to Salesforce Setup > Users > Profiles
2. Find the user's profile and edit it
3. Ensure "API Enabled" is checked under System Permissions
4. Save and retry the connection
### Custom Fields Not Created
**Cause:** The user may lack Modify Metadata permission or field creation is restricted.
**Solution:**
1. Use a System Administrator account to connect initially
2. Custom fields will be created automatically
3. You can then adjust permissions and reconnect with a different user if needed
### Data Not Syncing to Salesforce
**Cause:** Field-level security may be preventing writes to custom fields.
**Solution:**
1. Go to Salesforce Setup > Object Manager
2. Select the affected object (Lead, Contact, Account, or Opportunity)
3. Click Fields & Relationships
4. For each Navattic custom field, click the field name
5. Click "Set Field-Level Security"
6. Ensure the integration user's profile has "Visible" and "Editable" checked
7. Save changes
### "Record Locked" or "Unable to Lock Row" Errors
**Cause:** Salesforce record locking during high-volume updates.
**Solution:**
* These errors are typically temporary and Navattic will retry
* If persistent, check for workflow rules or validation rules that may be causing conflicts
* Consider adjusting the timing of your Playbook triggers to spread out updates
### Permission Set Assignment Fails
**Cause:** User already has maximum number of permission set assignments.
**Solution:**
1. In Salesforce Setup, go to Users > Permission Sets
2. Find "Navattic Permission Set"
3. Manually assign it to the integration user
4. Or consolidate other permission sets if the user has reached the limit
## Security Considerations
### OAuth Token Storage
Navattic stores OAuth tokens securely and uses them only to sync data according to your configured Playbooks. Tokens are:
* Encrypted at rest
* Only used for authorized API operations
* Automatically refreshed when needed
* Revocable at any time from Salesforce
### Data Access
The integration only:
* Reads data needed to match visitors to Leads/Contacts
* Writes engagement data to fields you've mapped
* Never modifies other Salesforce data
* Respects your Salesforce sharing rules and permissions
### Disconnecting the Integration
To disconnect Navattic from Salesforce:
1. In Navattic: Go to Settings > Integrations > Salesforce and click **Disconnect**
2. In Salesforce: Go to Setup > Connected Apps OAuth Usage to view and revoke the connection
Custom fields created during setup will remain in Salesforce but will no longer receive updates from Navattic.
**Congratulations** -- You've finished setting up Salesforce with Navattic. Reps can now connect Salesforce opportunities to share links.
Go to the Salesforce integration settings in Navattic and set up field mappings to control which engagement data syncs to which Salesforce fields.
See [Field Mappings](/integrations/field-mappings) for detailed configuration options.
Create Playbooks to define when and how demo engagement data should sync to Salesforce.
See [Salesforce Integration](/integrations/salesforce) for complete setup instructions.
## Opportunity owner data
When a presentation is connected to a Salesforce opportunity, Navattic automatically looks up the opportunity owner in Salesforce and stores their details as custom properties on the session.
| Property | Description |
| ------------------------- | ----------------------------------------------------------------- |
| **OpportunityOwnerEmail** | The email address of the Salesforce user who owns the opportunity |
| **OpportunityOwnerId** | The Salesforce user ID of the opportunity owner |
These values are populated automatically — no additional configuration is required. They are included in webhook payloads and can be used in downstream workflows, such as routing notifications to the rep who owns the deal.
Opportunity owner data is only populated when a presentation share link has a Salesforce opportunity connected. See [Present demos](/launchpad/share/present#salesforce-opportunity) for instructions on connecting an opportunity to a share link.
## Field guide: viewing Navattic sessions in Salesforce
Once your admin has completed the setup above, every demo session that originates from one of your share links is automatically logged as a **Navattic Session** record in Salesforce — no manual data entry required.
### Connect your share links to opportunities
Sessions only appear on an opportunity when your share link is connected to one at the time you create it. Without that connection, session data is still captured but won't surface on the opportunity record.
To connect a share link to an opportunity:
* When sharing a demo through Launchpad, see [Sharing demos](/launchpad/share/demos#add-salesforce-opportunity) for step-by-step instructions.
* When creating a presentation for a live call, see [Present demos](/launchpad/share/present#salesforce-opportunity).
Opening Launchpad directly from a Salesforce Opportunity page automatically pre-fills the Opportunity field — no searching required. This auto-fill stays active for every additional share link you create from that same page.
### Find session data on the opportunity
Once a prospect views your demo, open the Opportunity record in Salesforce and scroll to the **Navattic Sessions** related list. Each row represents one individual viewing session — so if three people at the same account watch the demo, you'll see three separate rows.
### How to read each field
| Field | What it tells you |
| ----------------------------- | ------------------------------------------------------------------------------------------------------------------------------------------------------ |
| **Full Name** | The name of the person who viewed the demo. Includes stakeholders who filled in the recipient form, even if they weren't on your original invite list. |
| **Email** | The email address of the viewer. Use this to identify new contacts and update your outreach. |
| **Started At** | The date and time the session began. Use this to gauge recency and time your follow-up. |
| **Duration (minutes)** | How long the viewer spent in the demo. Longer sessions typically signal stronger engagement. |
| **Steps Viewed** | The number of demo steps the viewer completed. Helps you understand how far they got and where drop-off may have occurred. |
| **Demos** | Which demo or demos the viewer explored during the session. |
| **Flows** | Which flows within the demo the viewer clicked into. |
| **Very Interested Areas** | Topics the viewer flagged as high interest. Lead with these in your next conversation. |
| **Somewhat Interested Areas** | Topics the viewer showed moderate interest in. Worth addressing, but not the headline. |
| **Not Interested Areas** | Topics the viewer skipped or flagged as low priority. Avoid spending call time on these. |
| **Opportunity** | The Salesforce Opportunity this session is linked to. |
| **Account** | The Account associated with the linked Opportunity. |
| **Contact** | The Contact record matched to the viewer's email, if one exists. |
| **Lead** | The Lead record matched to the viewer's email, if one exists and no Contact match was found. |
| **Session ID** | A unique identifier for this session. Share this with support if you ever need to troubleshoot a specific viewing event. |
### Plays to run
Before any follow-up call, open the Navattic Sessions related list on the opportunity and note the **Very Interested Areas** for each viewer. Structure your agenda around those topics first — your prospect has already told you what they care about.
Check **Not Interested Areas** so you know what to skip. Spending time on areas a prospect explicitly deprioritized can stall momentum.
If you see a **Full Name** or **Email** you don't recognize, the demo was likely forwarded internally. That's a buying signal — someone on your contact's team is doing their own research.
Add that person as a contact on the opportunity and reach out directly. Multithreading early reduces the risk of a single point of failure in the deal.
Use the **Started At** field to follow up while the demo is still fresh. A same-day or next-day message referencing what the prospect explored tends to get a much higher response rate than a generic check-in.
See [When to share demos](/launchpad/share/when-to-share) for more guidance on timing your outreach.
If an opportunity has gone quiet and you see no new sessions in the past two weeks, it's a good time to re-engage. Create a fresh share link focused specifically on the prospect's **Very Interested Areas** from their last session, and send it with a short, personalized note.
A targeted demo link gives the prospect a low-friction reason to re-engage without requiring them to join a call.
If the Navattic Sessions related list isn't visible on your opportunity records, ask your Salesforce admin to add it by following the [setup steps](#setup-steps) on this page.
## Troubleshooting
### Connection Fails with "Insufficient Permissions"
**Cause:** The Salesforce user doesn't have API Enabled permission.
**Solution:**
1. Go to Salesforce Setup > Users > Profiles
2. Find the user's profile and edit it
3. Ensure "API Enabled" is checked under System Permissions
4. Save and retry the connection
### Custom Fields Not Created
**Cause:** The user may lack Modify Metadata permission or field creation is restricted.
**Solution:**
1. Use a System Administrator account to connect initially
2. Custom fields will be created automatically
3. You can then adjust permissions and reconnect with a different user if needed
### Data Not Syncing to Salesforce
**Cause:** Field-level security may be preventing writes to custom fields.
**Solution:**
1. Go to Salesforce Setup > Object Manager
2. Select the affected object (Lead, Contact, Account, or Opportunity)
3. Click Fields & Relationships
4. For each Navattic custom field, click the field name
5. Click "Set Field-Level Security"
6. Ensure the integration user's profile has "Visible" and "Editable" checked
7. Save changes
### "Record Locked" or "Unable to Lock Row" Errors
**Cause:** Salesforce record locking during high-volume updates.
**Solution:**
* These errors are typically temporary and Navattic will retry
* If persistent, check for workflow rules or validation rules that may be causing conflicts
* Consider adjusting the timing of your Playbook triggers to spread out updates
### Permission Set Assignment Fails
**Cause:** User already has maximum number of permission set assignments.
**Solution:**
1. In Salesforce Setup, go to Users > Permission Sets
2. Find "Navattic Permission Set"
3. Manually assign it to the integration user
4. Or consolidate other permission sets if the user has reached the limit
## Security Considerations
### OAuth Token Storage
Navattic stores OAuth tokens securely and uses them only to sync data according to your configured Playbooks. Tokens are:
* Encrypted at rest
* Only used for authorized API operations
* Automatically refreshed when needed
* Revocable at any time from Salesforce
### Data Access
The integration only:
* Reads data needed to match visitors to Leads/Contacts
* Writes engagement data to fields you've mapped
* Never modifies other Salesforce data
* Respects your Salesforce sharing rules and permissions
### Disconnecting the Integration
To disconnect Navattic from Salesforce:
1. In Navattic: Go to Settings > Integrations > Salesforce and click **Disconnect**
2. In Salesforce: Go to Setup > Connected Apps OAuth Usage to view and revoke the connection
Custom fields created during setup will remain in Salesforce but will no longer receive updates from Navattic.