> ## Documentation Index
> Fetch the complete documentation index at: https://docs.navattic.com/llms.txt
> Use this file to discover all available pages before exploring further.

# HubSpot

> Connect your demos with HubSpot to create records from Visitors.

export const MediaCard = ({title = '', url, type = 'demo'}) => {
  const attributes = type === 'demo' ? {
    'data-navattic-open': url,
    'data-navattic-title': title
  } : {
    'data-video': url
  };
  return <div {...attributes} className="hidden md:inline-block w-auto cursor-pointer overflow-hidden rounded-lg border border-gray-200 dark:border-gray-700 shadow-sm">
<div className="flex items-center gap-3 bg-white dark:bg-gray-800 px-3 py-2">
<div className={`flex h-7 w-7 items-center justify-center rounded-md ${type === 'video' ? 'bg-blue-100 dark:bg-blue-900' : 'bg-orange-100 dark:bg-orange-900'}`} style={{
    backgroundColor: type === 'video' ? 'var(--video-bg)' : 'var(--demo-bg)'
  }}>
<Icon icon={type === 'video' ? 'circle-play' : 'square-mouse-pointer'} color={type === 'video' ? 'var(--video-icon)' : 'var(--demo-icon)'} />
</div>
<div>
<div className="text-sm font-medium text-gray-900 dark:text-gray-100">
{type === 'video' ? 'Watch video' : 'Try a demo'}
</div>
<div className="text-sm text-gray-500 dark:text-gray-400">{title}</div>
</div>
</div>
<style jsx>{`
  :root {
    --video-bg: #dbeafe;
    --video-icon: #2563eb;
    --demo-bg: #ffedd5;
    --demo-icon: #ea580c;
  }
  :global(.dark) {
    --video-bg: #1e3a8a;
    --video-icon: #60a5fa;
    --demo-bg: #7c2d12;
    --demo-icon: #fb923c;
  }
`}</style>
</div>;
};

<Frame>
  <img className="overflow-hidden rounded-xl border" src="https://mintcdn.com/navattic-app/eEo16-sBVsd0fYuf/images/hubspot.png?fit=max&auto=format&n=eEo16-sBVsd0fYuf&q=85&s=9c2bed15428e5522a0ef366b9c1041c6" alt="Hubspot integration" width="1736" height="768" data-path="images/hubspot.png" />
</Frame>

<Info>
  Check that you are [Identifying visitors](/tracking/identify/visitors) before setting up the Hubspot integration.
</Info>

The HubSpot integration is used to:

1. Create or update HubSpot Contacts with Navattic Visitor and Engagement data
2. Create and update HubSpot Companies with Navattic Account and Engagement data.

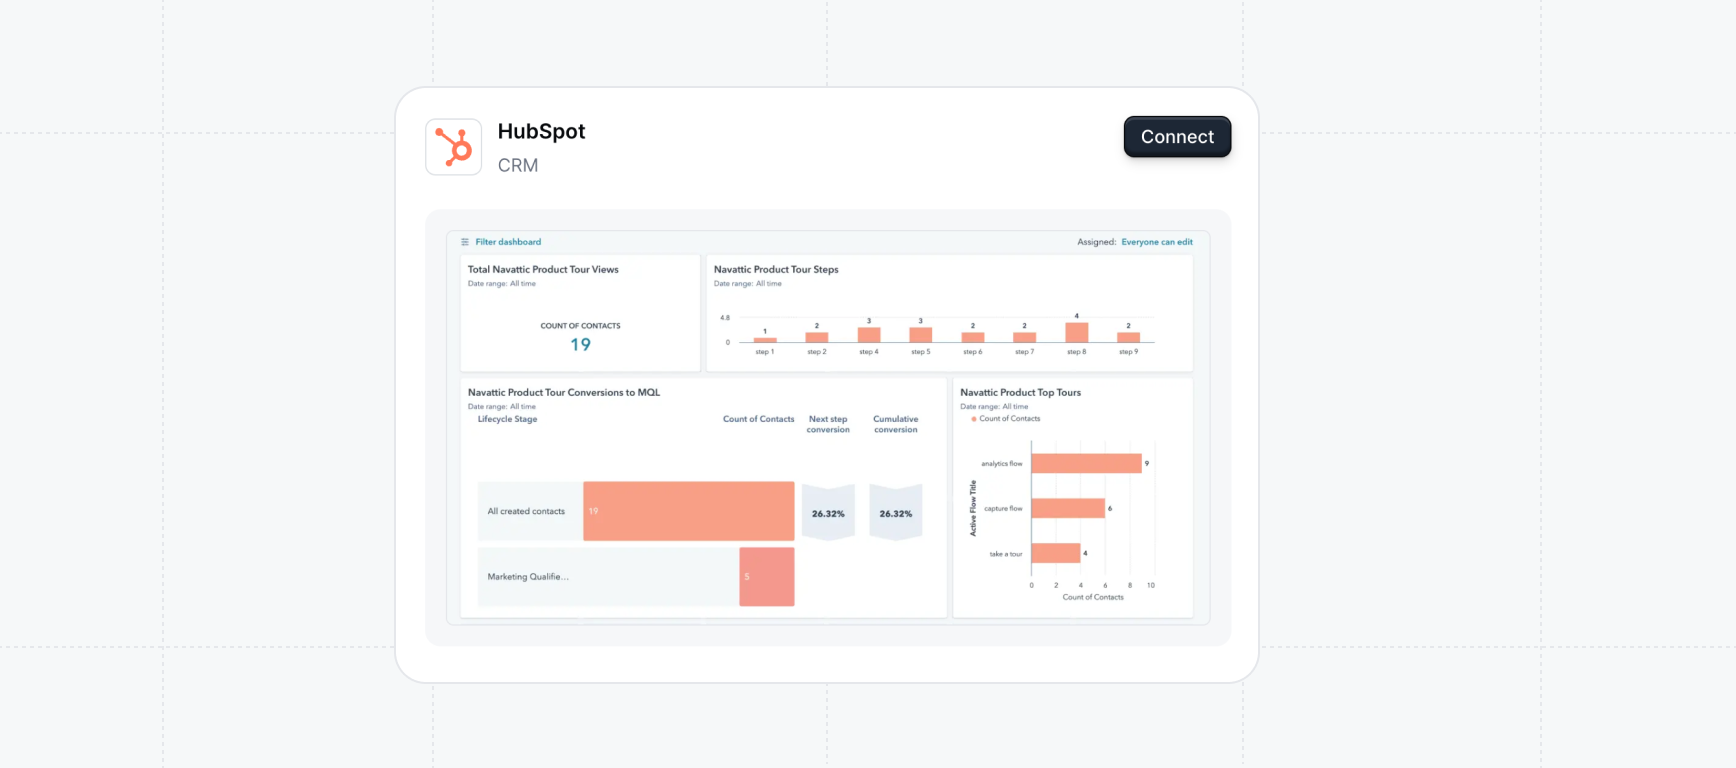
Once the data is available in HubSpot, HubSpot dashboards and reports can be created to answer questions like:

* Which demos generate the most leads?
* What % of leads originating from Navattic later convert to MQLs, and onwards?
* Which steps in my demo are most visitors dropping off at?

<MediaCard url="https://navattic-docs.navattic.com/qd9m09dx" type="demo" title="Hubspot" />

<br />

## Setting up the HubSpot Integration

Follow these steps or the demo below to set up the Hubspot integration with Navattic:

<MediaCard url="https://navattic-docs.navattic.com/nj3h0xem" type="demo" title="Hubspot Setup" />

<br />

<Steps>
  <Step title="Connect with HubSpot">
    Navigate to `Integrations` in Settings and select Hubspot. Click on Connect and follow the instructions to authorize your Hubspot account.
  </Step>

  <Step title="Set Up Field Mapping">
    [Field mappings](/navattic-field-mappings) allow you to control which pieces of Navattic's data go where. To set up field mapping, go to the **Settings** tab of your HubSpot integration. Open the **Field Mapping** dropdown, and start mapping fields. If you have [Account-Based Engagement](https://docs.navattic.com/tracking/identify/accounts#identifying-accounts), you will also see the option to set up Company field mapping. Fields on the left are Navattic data, and fields on the right are destinations within your HubSpot instance. Navattic uses HubSpot Contact Properties as data destinations.

    <Note>
      If you are setting up field mappings for Contacts, Email is a required field.
    </Note>
  </Step>

  <Step title="Create a Playbook">
    Once your HubSpot integration is fully set up, visit [Playbooks](/integrations/playbooks) in your Workspace to start pushing data into HubSpot. You can use a Template or create your own Playbook.

    There are four separate HubSpot Actions that you can set up: Sync contact, Send timeline events at the contact level, Sync account, and Send timeline events at the company or deal level.

    <Note>
      A Playbook consists of [Audiences](/integrations/playbooks) and Actions. You can use one of the default Audiences or you can create your own. If you create your own, remember to add new demos to the Audience if you are choosing to filter by specific demos.
    </Note>
  </Step>

  <Step title="Run a Test">
    Once the Playbook is set up, run a quick test to ensure this test data populates in HubSpot. To run a test, click the three dots next to the **Save** button > **Test run.**
  </Step>

  <Step title="Create HubSpot Dashboards to see ROI">
    [Try a demo](https://navattic-website.navattic.com/k8puwxfx) to see how Navattic-created Contacts appear in HubSpot.

    * Once connected, Navattic will send **email** (required) and all of the selected mapped fields to your HubSpot CRM.
    * These Contacts will be identifiable by the property **Original source 2** is Navattic.
    * The Original Source will reflect "Offline sources", per [HubSpot's default conditions](https://knowledge.hubspot.com/contacts/understand-source-properties#:~:text=A%20contact%E2%80%99s%20Original%20source%20or%20Latest%20source%20value%20will%20be%20one%20of%20the%20following%3A). Now you can use HubSpot dashboards to visualize your demo engagment data! We recommend creating [this HubSpot dashboard](https://navattic-website.navattic.com/k8puwxfx) to see demo views, step views, conversions, and the number of Contacts created by each demo.

    <MediaCard url="https://navattic-docs.navattic.com/aj29d07x8" type="demo" title="Hubspot Dashboard" />

    <br />

    <MediaCard url="https://www.loom.com/embed/25ed50ddc82f468bb887a0eb9a69de94" type="video" title="HubSpot Dashboard" />
  </Step>
</Steps>

<Tip>
  Tip: You can also create [HubSpot sequences](https://knowledge.hubspot.com/sequences/create-and-edit-sequences) based on visitor engagement with demos. The [HubSpot Knowledge Base](https://knowledge.hubspot.com/) contains more information on creating dashboards, reports, and sequences.
</Tip>

## Pipeline impact

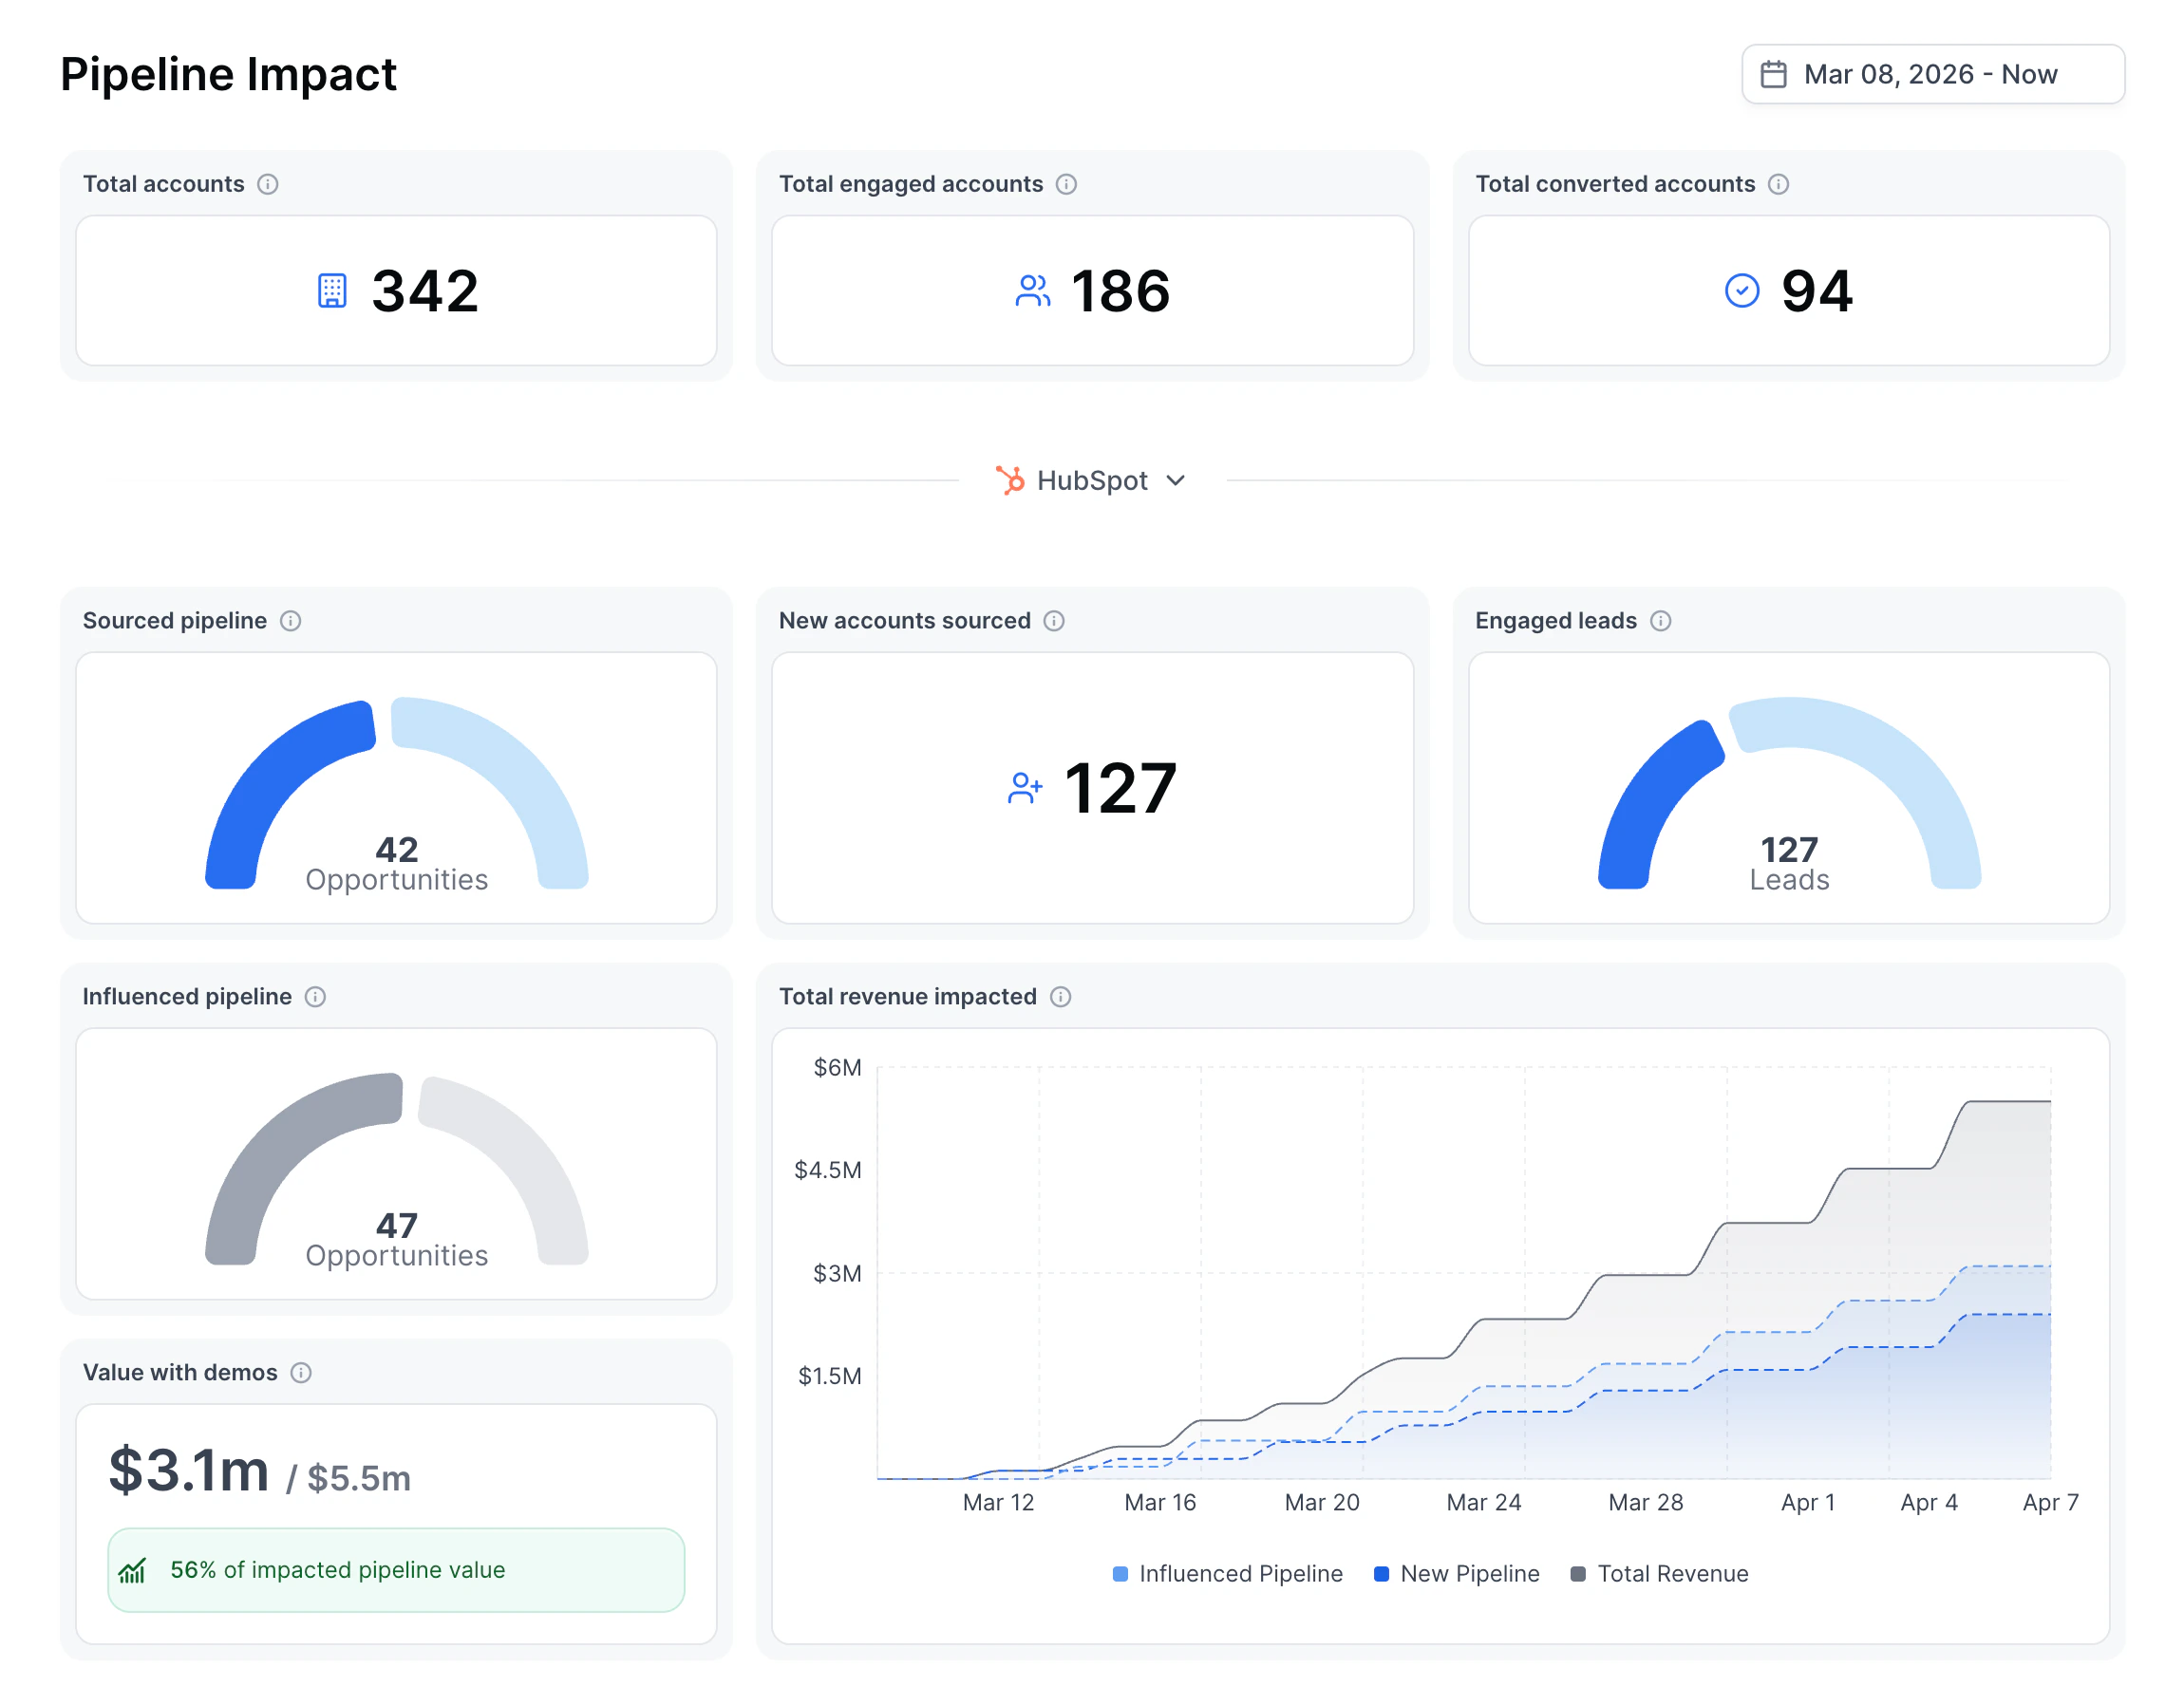
Navattic can pull deal data from HubSpot to attribute pipeline to your demos. This feature is available to all workspaces with HubSpot connected and requires enabling the **Deals sync** setting in your HubSpot integration settings.

<Frame>
  <img src="https://mintcdn.com/navattic-app/SFiOMM97OTCgDUoC/images/integrations-hubspot-pipeline.png?fit=max&auto=format&n=SFiOMM97OTCgDUoC&q=85&s=468b17d6b57914665067145a35a5522a" alt="Integrations Hubspot Pipeline" width="2300" height="1796" data-path="images/integrations-hubspot-pipeline.png" />
</Frame>

### How it works

By default, the HubSpot integration pulls accounts and visitor data based on demo views and sessions. When **Deals sync** is enabled, Navattic uses HubSpot Deals as the data entrypoint — the same approach used for Salesforce — and maps deals to sessions, companies, and visitors in Navattic.

This lets you see which demos influenced open and closed deals, giving you a direct view of demo-attributed pipeline.

### Enabling Deals sync

<Steps>
  <Step title="Go to your HubSpot integration settings">
    Navigate to **Settings** > **Integrations** and select **HubSpot**.
  </Step>

  <Step title="Enable Deals sync">
    In the **Settings** tab, toggle on **Deals sync**. Once enabled, Navattic will begin pulling deal data from HubSpot.
  </Step>
</Steps>

<Note>
  Deals sync requires that your HubSpot integration is already connected and that you have deal data in HubSpot. If you do not see pipeline data after enabling this setting, confirm that your HubSpot Deals are associated with the Contacts that Navattic has identified.
</Note>
